Clio & SpeakWrite
Transcription Integration
Clio is a legal technology company that offers cloud-based software that handles various law practice management tasks. With Clio, you can add apps, like SpeakWrite, to streamline your business. Continue reading to see how easy it is to set up and use the SpeakWrite app in your Clio account!
How to Setup SpeakWrite in your Clio Dashboard
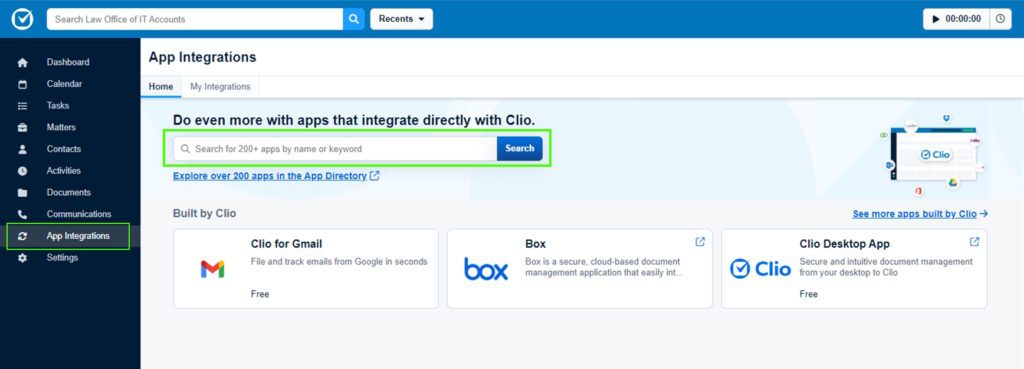
- Sign in to Clio Manage and navigate to “App Integrations“.
- Search for the SpeakWrite App.
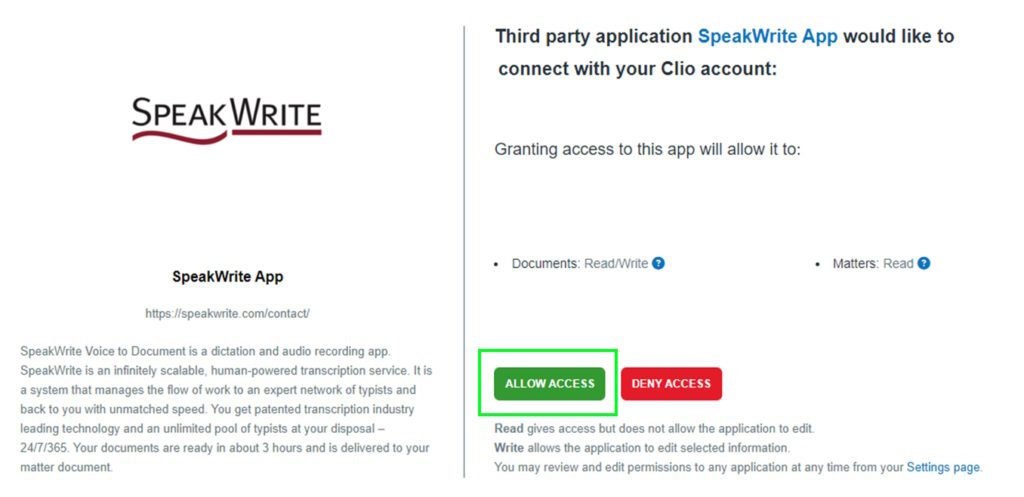
- Click “Allow Access“.
- This is a one-time process that will allow the SpeakWrite app to show up in your Clio dashboard.
How to Dictate using the SpeakWrite Recorder in the Clio Dashboard
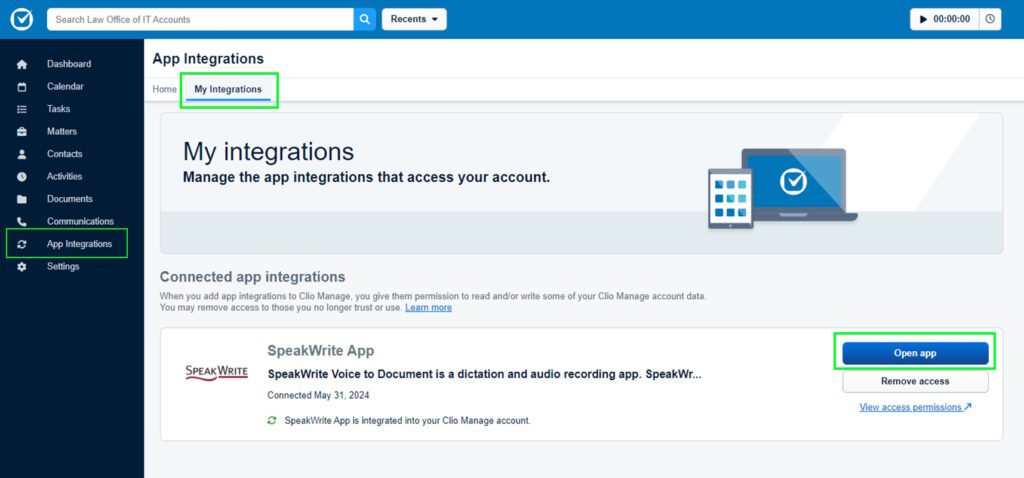
- Navigate to “App Integrations” and select the “My Integrations” tab.
- Find the SpeakWrite App and click “Open App“.
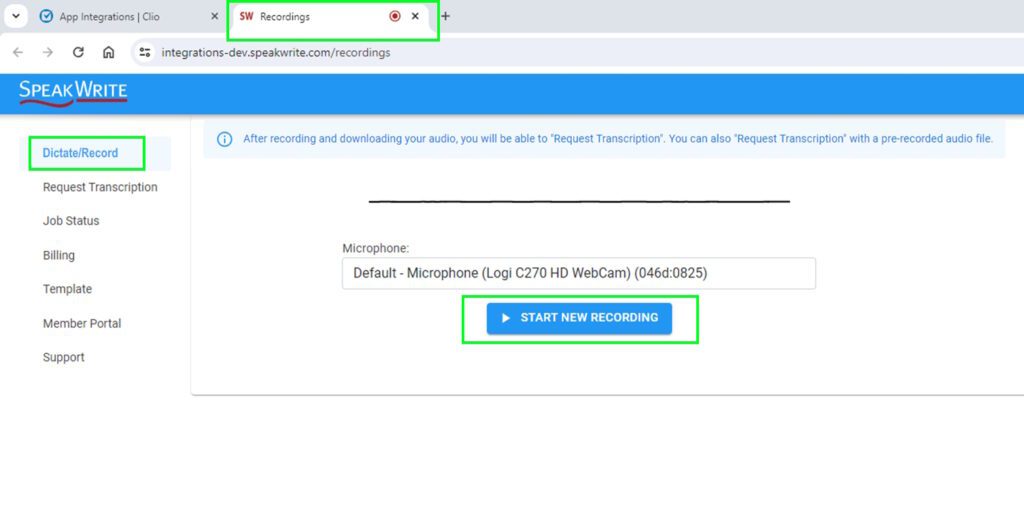
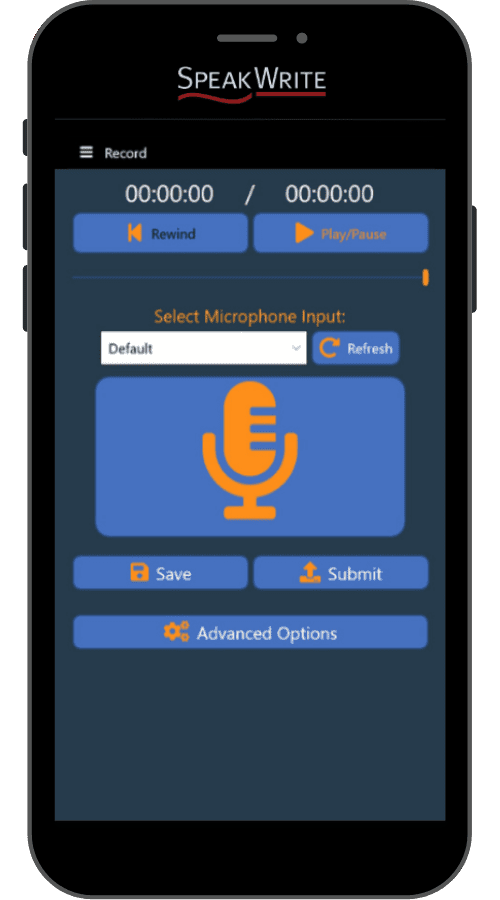
- In the new SpeakWrite App browser tab, on the “Dictate/Record” page, select the Microphone you would like the app to use.
- Click “Start New Recording“.
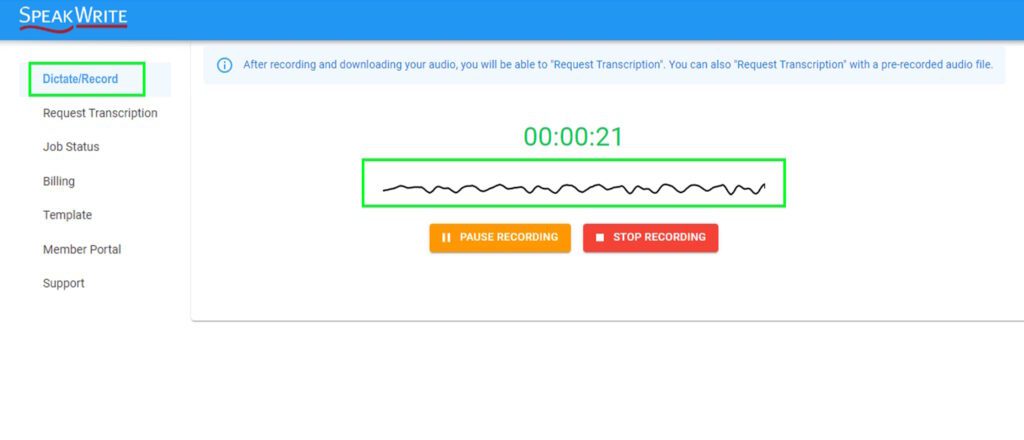
- When you start recording, you will notice the sound bar indicating that audio is detected.
- Pause if you need a moment, but plan to continue recording.
- Stop recording when complete.
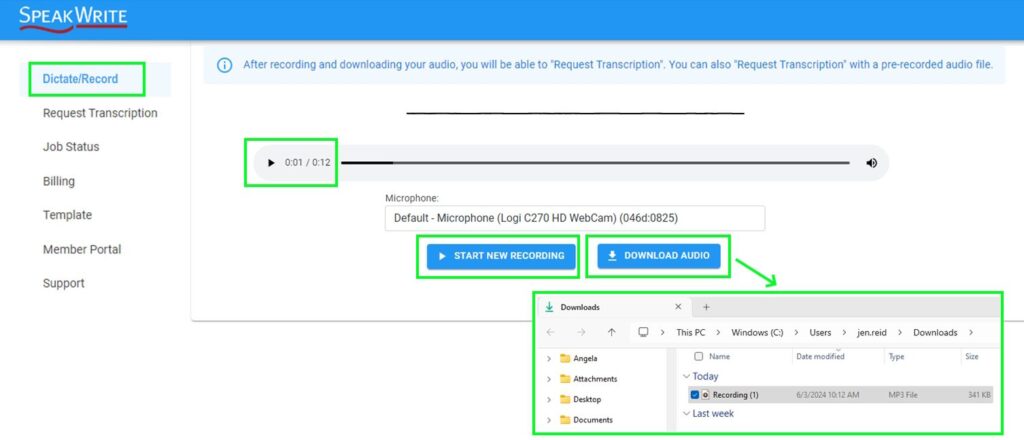
- Once the recording has stopped, you can click “Start New Recording” or “Download Audio“.
- Press the play icon to playback the recorded audio.
IMPORTANT!
Download the audio file before leaving this page.
Otherwise, the audio file will be lost.
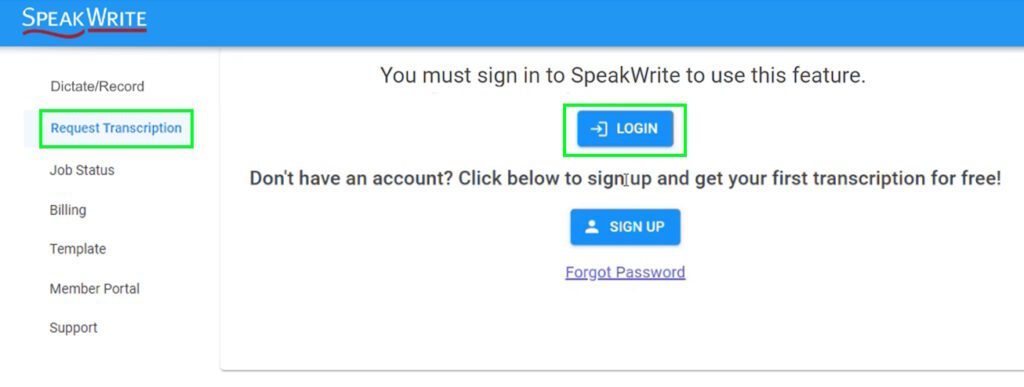
- Once the audio has been downloaded, navigate to “Request Transcription“.
- Click “Login” to sign in to your SpeakWrite Account.
- If you do not have an account, click “Sign Up” and create your free SpeakWrite account.
NOTE:
Logging in is only required once.
After initial login, you will be taken directly to the “Request Transcription” page.
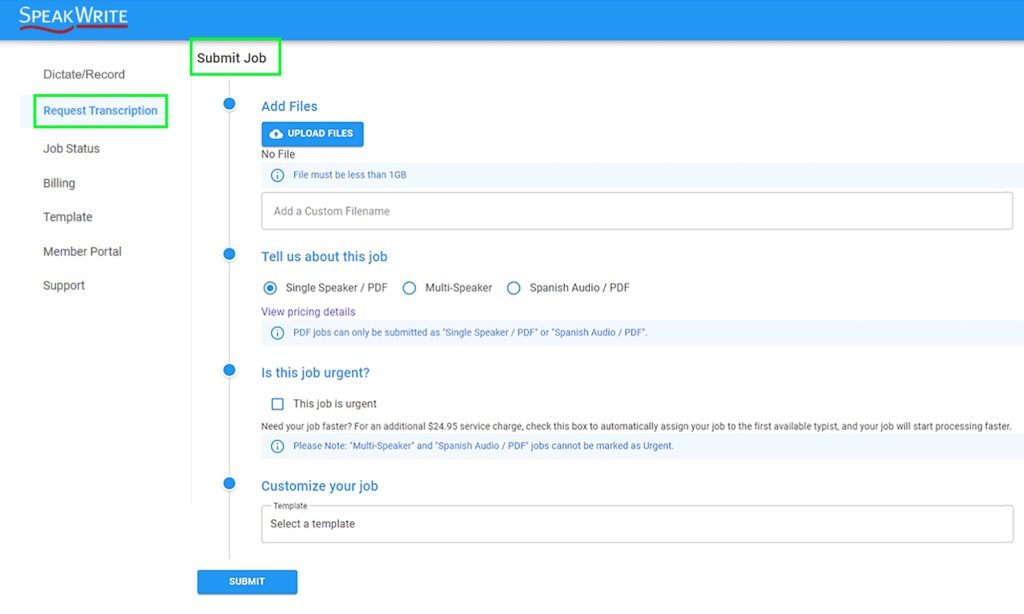
- On the “Submit Job” page, upload the file you recorded.
- Fill out the form and click “Submit“.
- Optional: Add a Custom Filename. This will help you identify the file later when uploading it to the Clio Matter.
NOTE:
You can upload any recorded audio or PDF directly to the “Request Transcription” page. An audio file does not need to be recorded using the SpeakWrite App.
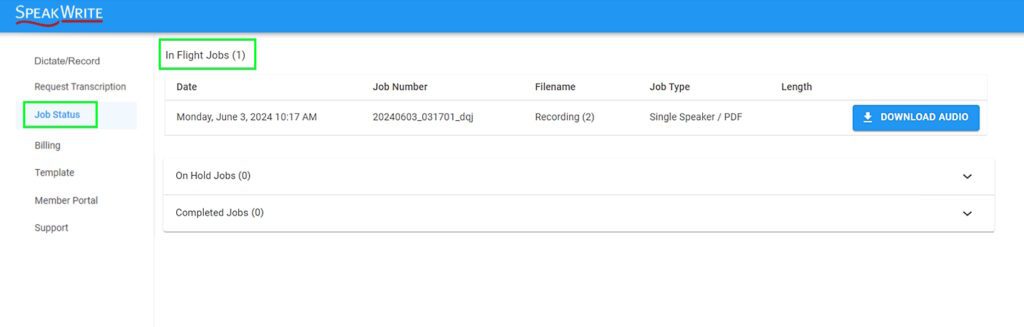
- On the “Job Status” page, you will see your job under “In Flight Jobs“, which means it has been submitted to SpeakWrite for transcription.
- You will also get an email notification that your recording has been received.
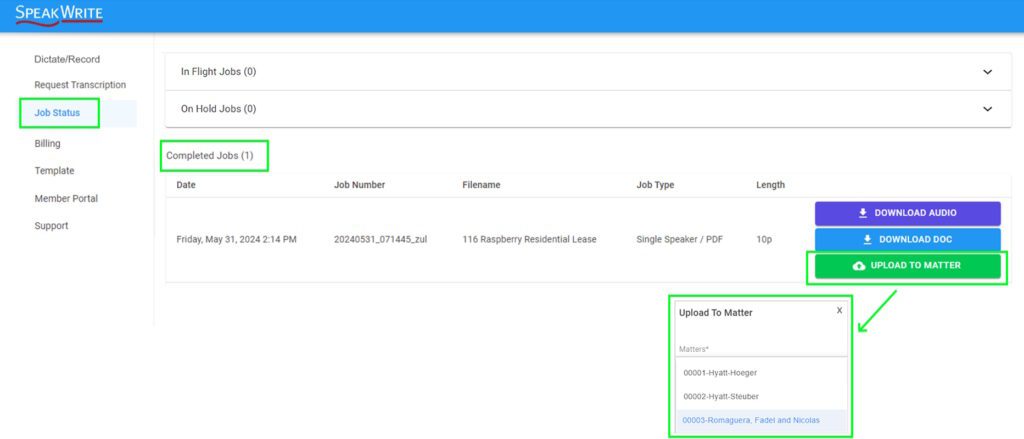
- When transcription is complete, you will see your job under “Completed Jobs“.
- You will also get an email notification that your transcription is complete.
- Click “Upload to Matter” and select the Matter to which the file belongs.
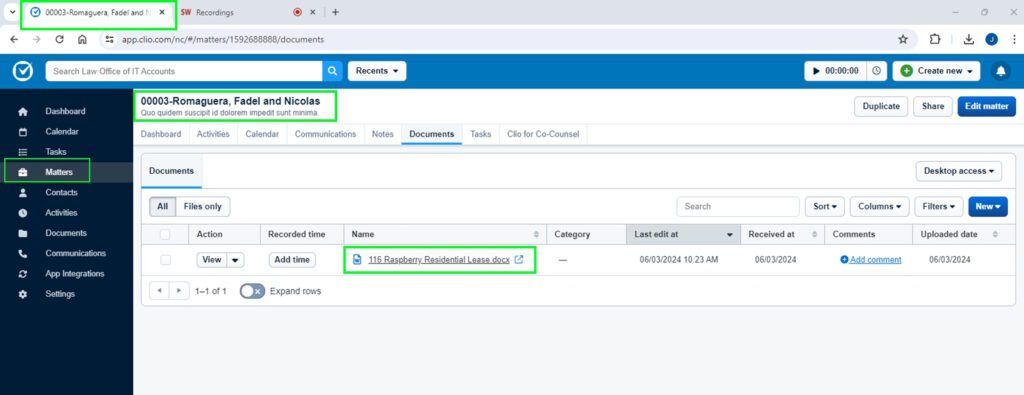
- In your Clio Dashboard, the document can be found under the previously selected Matter, on the “Documents” tab.
How to Upload Recordings to SpeakWrite and have the Completed Document Filed in your Clio Dashboard Matter
First, you will need to connect your SpeakWrite Account to your Clio Account. This is a one-time process.
- Sign in to your SpeakWrite Account and navigate to “Preferences” then select the “Integrations” tab.
- Click “Link Clio Account“.
- This will link your Clio Account to your SpeakWrite Account, allowing us to place your completed document in your selected Matter.

- Click “Allow Access“.
- This is a one-time process that will allow SpeakWrite to access your Clio Account.
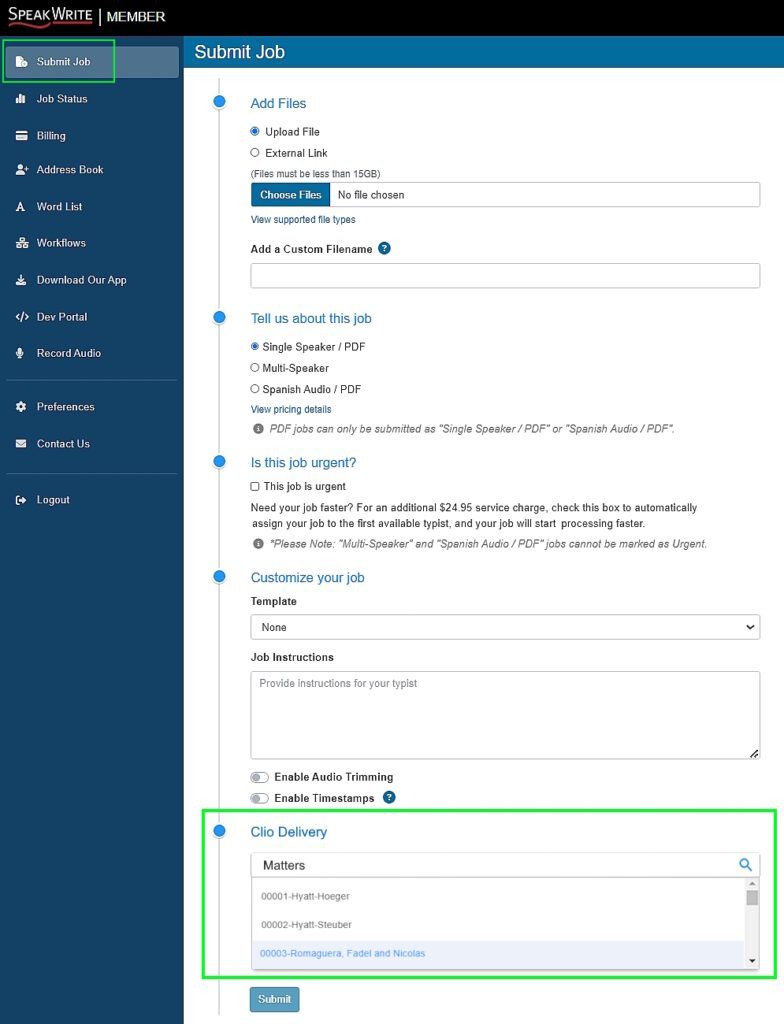
- On the “Submit Job” page, you will see the “Clio Delivery” section.
- Fill out the form and select the Clio Matter to which the file belongs then click “Submit“.
- Once transcription is complete, the document will be filed in your Clio Dashboard, under the previously selected Matter, on the “Documents” tab.
How to Create Dictations using the SpeakWrite Mobile/Desktop App and have the Completed Document Filed in your Clio Dashboard Matter
First, you will need to connect your SpeakWrite Account to your Clio Account. This is a one-time process.
- Sign in to your SpeakWrite Account and navigate to “Preferences” then select the “Integrations” tab.
- Click “Link Clio Account“.
- This will link your Clio Account to your SpeakWrite Account, allowing us to place your completed document in your selected Matter.
- Click “Allow Access“.
- This is a one-time process that will allow SpeakWrite to access your Clio Account.
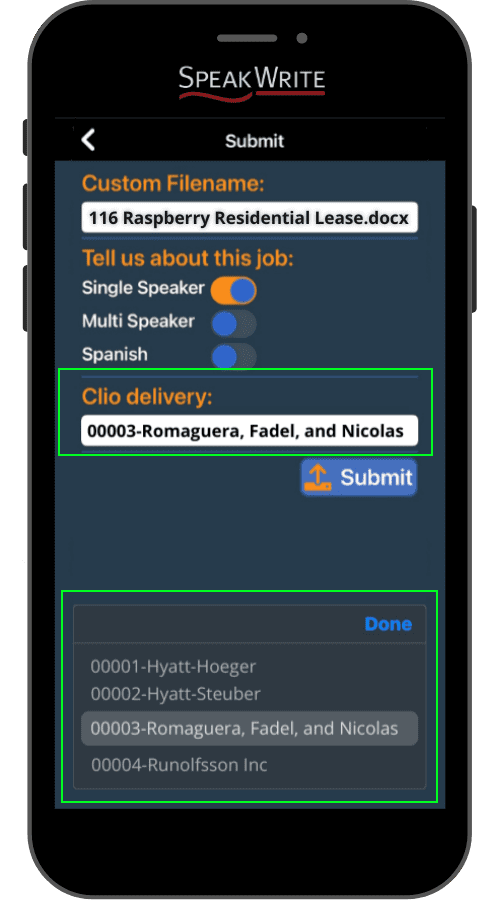
- In the SpeakWrite Mobile/Desktop App, when creating your dictation, on the “Submit” screen, you will see the “Clio Delivery” section.
- Fill out the form and select the Clio Matter to which the dictation belongs then click “Submit“.
- Once transcription is complete, the document will be filed in your Clio Dashboard, under the previously selected Matter, on the “Documents” tab.
Your Clio SpeakWrite Account
Your account is a fully functional SpeakWrite account!

You can use our Mobile / Desktop App with your account!
Give Us Feedback On Our Clio Integration!
SpeakWrite’s Clio integration is new, and we are looking for ways to improve its functionality and streamline workflow for lawyers using the app.
If there are feature improvements that you would like to see, please let us know by clicking Contact Us below. We are eager to improve the functionality based on real user feedback!