How to Transcribe Your Zoom Meeting Recording using Speakwrite

Transcribe Zoom Meetings

Zoom is one of the most popular platforms for video conferences and meetings. Its popularity has reached new heights during Covid as many offices sent their workforce home. How can you make the most of your Zoom virtual meetings? One way is to have a complete and accurate transcription of your meetings. Here is a step-by-step guide on how to transcribe your Zoom virtual meetings using SpeakWrite’s fast transcription services.

Upload your meeting video for transcription:

1. Enable recording on your Zoom account.

  1. Sign in to the Zoom web portal and click My Meeting Settings (if you are an account administrator) or Meeting Settings (if you are an account member).
  2. In the Recording tab, navigate to the Local Recording option and verify that the setting is enabled.
  3. If the setting is disabled, click the toggle to enable it. If a verification dialog displays, choose Turn On to verify the change.


Note: If the option is grayed out, it has been locked at either the group or account level, and you will need to contact your Zoom administrator.

2. Record meeting audio.

The host must record the meeting or grant the ability to record to a participant.

  1. Start a Zoom meeting as the host.
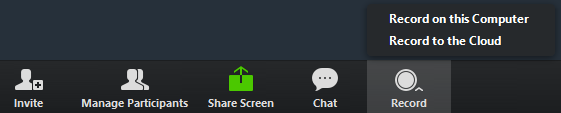
  2. Click the option to Record
  3. If there is a menu, select Record on this Computer.

Hosts will see the following recording indicator in the top-left corner while recording is active.

Participants will see the following indicator in the top-left corner while the recording is active.

  • Click Participants to see which users are currently recording.
  • After the meeting has ended, Zoom will convert the recording so you can access the files.
  • Once the conversion process is complete, the folder containing the recording files will open
  • Dial-in participants will hear a message informing them that the meeting is now being recorded unless disabled by the host.
  • By default, the audio/video file (MP4) will be named Zoom_0.mp4. The audio-only file (M4A) is named audio_only.m4a.
  • If the meeting unexpectedly shuts down or if the conversion process is interrupted, the recording files could become corrupted and non-recoverable. Restarting or shutting down your computer, putting the hard disk to sleep, or closing your laptop will interrupt the conversion process.
  • If the conversion process is not successful after the meeting has ended, you can try to convert the files again by navigating to the recording location and double-clicking the recording files.
  • You can record the meeting in different layouts including active speakergallery view, and shared screenLearn more about recording layouts

3. Locate the audio file once the meeting is over.

By default, all recordings will be placed in a Zoom folder found in the following file path on these devices:

  • PC: C:\Users\User Name\Documents\Zoom
  • Mac: /Users/User Name/Documents/Zoom

To access recording files:

You can access the audio files by navigating to the folder listed above or using the Zoom desktop program:

  1. Open the Zoom desktop program and click Meetings.
  2. Click the Recorded tab and select the meeting with a local recording.
  3. Click on the Open button to open the folder that contains the recording files.

Look for the files in the M4A format. This is the Audio-only file that is named audio_only.m4a by default. Each subsequent recording is in sequential order: audio_only_0,audio_only_1, etc.

4. Upload the audio file to your SpeakWrite account for transcription.

Don’t have a SpeakWrite account? Open your account by clicking here:

Once you sign up, go to https://speakwrite.com/login.

Enter your credentials and click Log In.

Click on Browse to locate the meeting audio file.

*Hint: You can also drag and drop your audio file on the white box under Choose a File.

Make sure to check off Multi-Speaker Job since this is a meeting of two or more participants.

Click Submit and you will job will be submitted for transcription


5. Sit back, relax and do something else.

Seriously, grab a coffee, stretch your legs, take a walk or simply get caught up with pending work. Your meeting transcription will be in the capable hands of our qualified, US-based transcriptionists.

6. Receive the transcription in about 3 hours.

Your accurate meeting transcription will be delivered via email in about 3 hours.

By recording the meeting or using the audio generated from video-conference platforms like Zoom, you can leverage the power of having a full transcript of what was discussed and decided. Also, you can have everyone’s full attention focused on the content of the meeting. 

So, stay safe from the COVID-19 coronavirus and keep work continuity by having a concise, accurate and reliably transcription with a proven business transcription service as SpeakWrite. 

Create your SpeakWrite account and start your free trial today, click the button below!

Know somebody who can benefit from this? Share it with a colleague or friend!

Email
Facebook
Twitter
LinkedIn

How to Mail Your Recorded Tapes


Many clients have recorded mini or standard cassette tapes to submit to us for transcription, but would rather not use their staff and resources to input these tapes into our system. In these instances, you can have these recorded cassettes delivered to us, and we will upload them into our system for transcription for you. To use this method of submission, you must have an existing SpeakWrite account. Send recorded tapes via overnight courier or USPS to the following address:

SpeakWrite Tape Processing Center
6300 Bridgepoint Pkwy
Building 1, Suite 100
Austin, Texas 78730

(800) 828-3889
Attn: Production Manager

With each delivery, you must print out a Recorded Tape Transmittal Sheet and enclose it with the tapes to be transcribed. Your package must include properly addressed and pre-paid packaging and label for the return of your tapes, using a service that provides for delivery tracking. If this is not included, we will return your tapes to you and charge your account a $10.00 delivery fee. Immediately upon our receipt of your tapes, we will input them into the SpeakWrite system for transcription. You will receive the transcription of the taped material via the email address on your account, just as any other SpeakWrite job. Your tapes will be returned to you via the delivery method you designate 48 hours after the completion of your transcript. All work transcribed will be charged at the standard, per word rate. There is no additional charge for handling or inputting the tapes. Be sure to erase all previously recorded tapes completely before recording any new dictation in order to avoid having old work transcribed by mistake or jeopardizing the quality of the newly recorded material.

GROUP ACCOUNT REQUEST

We appreciate your interest in SpeakWrite for your team.
Please fill out the form below and we’ll contact you shortly.

CONTACT CONTRACTOR SUPPORT

Thank you for being a transcriptionist applicant.
Please fill out the form below and we’ll contact you shortly.

CONTACT CUSTOMER SUPPORT

Thank you for being a valued SpeakWrite customer!
Please fill out the form below and we’ll contact you shortly.

Toll-Free Line: (800) 828-3889
Monday-Friday 7am-12am CST
Saturday-Sunday 8am-11pm CST
Holidays: 9am – 6pm CST
support@speakwrite.com